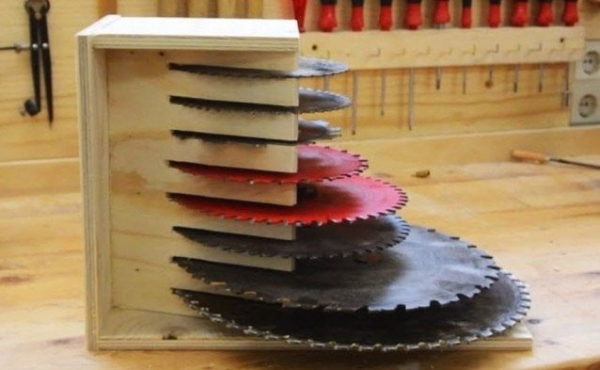
How to Make Saw Blade Storage Rack
When you work with circular saws on a regular basis, you start facing a situation where your blades are lying all around. Therefore, it is important that you have a mode of storing your circular saws and blades. Ideally, you want to build a tool storage rack that is large enough to store all your tools and accessories.

In this quick tutorial, will show you some actionable and practical ways in which you can start building your own blade storage rack. Hopefully, it will help make your workshop tidier and help keep you more organized with your tools and accessories.
You may also like to read other product reviews such as circular saw blade, reciprocating saw blade, jig saw blade, scroll saw blade, dado blade, and many more.
Materials you will need
Building a blade storage rack does not require expensive materials. The base component of your storage rack can simply be plywood. Plywood is cheap and available almost anywhere. You can even add any other material to this DIY project as it is limited only by your imagination.
We also need power tools like a circular saw for cutting and other basic tools and accessories like wood glue and a nailer.
Here is a basic rundown of the materials you will need in an easy to read list:
- 32 x 8 inches plywood
- A chisel
- A nailer
- Cordless drill (optional)
- Hand saw, circular saw or jigsaw for cutting
- Wood glue
Step 1: How to do it
Take two pieces of plywood (usually 2x4 plywood) and saw the edges through so that they are of a suitable size for holding your blades. It can be of any size, and if a 2 x 4 plywood is too short then you can easily extend it to any size you want.
Circular saw blades generally range from 4 inches to 12 inches. So you will have to saw them accordingly (see step 2) as it will need to hold blades of different dimensions.
You can cut the plywood by either using a hand saw or even a circular saw. You will also need a chisel later for the finish.
Step 2: Time to build
Cut the plywood with a circular saw or hand saw at a 19 degree angle. Each cut needs to be at the exact same distance and size. You can do as many as you want, depending on the number of blades it will store.
You will need around 2 pieces of plywood which will make the sides of this project.
Next glue those pieces together. The side of the blade rack will be V-shaped. You will need to secure the sides by nailing or gluing the pieces of plywood to the rack. This will provide additional support and solidity to your project.
Step 3: Solidity test
Ensure that there is no wobbling in your blade rack. You do not want it to be flimsy but firm on the ground. If you see any rattling or wobbling when you give it a shake, then you can secure it by nailing pieces of wood across.
Step 3: Make it perfect
You can further add a layer of paint, veneer or varnish to your blade storage rack for aesthetics. Although, this is highly optional. It still looks good without this makeup.
All finished
You can now sit down and have a treat because it was a job well done. And it wasn't even that hard!
Remark: this article is written based on the tuitorial of Cosmas
Last Updated on January 20, 2019 by Tom Bradly
