Best PVA Glues in 2020 and When To Use Them?
The PVA glue (polyvinyl acetate) is one of the most common adhesives in the market, and most people know it as what woodworkers use when joining two pieces of wood to make a joint. This glue is a rubbery synthetic polymer, and in most cases, it comes in white color. There is another common variation that is yellow in appearance, but they share a similar chemical formula.
Although the PVA is in most cases used as wood glue, it still has many other applications. Some of these other uses include bookbinding and as an addition to cement mortar.


Last update on 2024-04-17 / Affiliate links / Images from Amazon Product Advertising API
PVA Glue Facts
- The main chemical compound in PVA glue is polyvinyl acetate. This component is what ensures that the adhesive does not produce any harmful fumes and it is safe to handle without wearing a glove.
- PVA will set well when there is sufficient air circulation, and its chemical composition means that it dries the fastest at room temperature. Although this quick drying adhesive has a high bond strength, you always get the strongest connection by clamping the wood.
- It has a neutral pH, is flexible and the bond that it creates is permanent, and you cannot reverse its adhesion.
- Although this glue is in most cases white, it also comes in a version that has a yellow exterior, and it is what most people refer to as the carpenter's glue. Despite the difference in color, these glues have the same formula and properties.
- The PVA glue is water soluble, and it is okay to mix it with water to make it thinner. However, you should be careful to avoid over-diluting it because this can affect its adhesiveness.
Pros and Cons of PVA Glue
Advantages
- Safety: Most PVA glue brands have an extremely safe rating. This adhesive will not emit any fumes that can be harmful to people and it is also not hazardous to touch even when not wearing a glove. However, it can be toxic if you ingest it.
- Waterproof/Resistant: The water resistant properties of PVA are what makes it ideal for use in a cement and mortar mix and as an undercoat for highly absorbent surfaces. The level of water resistance and waterproof will depend on the particular formulation of the glue, but it is not suitable in cases where you have to submerge it for a long time.
- Easy Clean Up: Cleaning up any excess or spills is very easy when the glue is wet as you only need to wipe it off with a damp cloth. Also, the dried one is also easy to get rid off by chipping it off or sanding the surface if possible.
- Available and Inexpensive: The PVA glue is very common and widely available because most woodworking stores stock it and you can also get it in most online retails store. This availability is one of the things that make it inexpensive. Also, the fact that many companies produce it helps to make it very affordable.
- Strong and Flexible: This adhesive is strong once it sets and it can even be stronger than the wood that you use it to join. Also, the nature of this glue ensures that it maintains some degree of flexibility even after drying.
Disadvantages
- You Cannot Vanish Over It: When using PVA to join wood, you should always make sure that you scrape off any dried excess. One of the primary purposes for this is the fact that you cannot apply vanish over this glue. But, it is possible to paint over it.
- Short Open Time: You will not have a long open time when using this glue, and so complicated gluing projects might be hard to do on your own. If you are doing any gluing that takes long, it is a good idea to do it in steps.
- Not Gap Filling: The joints on your pieces of wood have to be very precise and form perfect fits because PVA does not have gap filling abilities. Also, you need to do some clamping for maximum effectiveness which means it might not work well for you if you do not have clamps.
PVA Glue Applications
#1. Bookbinding
PVA has been in use as a bookbinding adhesive for many years and although there are now many other glue types available for the same purpose most people still prefer to use it. What makes it the best for bookbinding is the fact that it is flexible and has some strong bonds that make it possible for the book to bind securely without compromising the pH of the pages.
#2. Woodworking
After using blades to create grooves, woodworkers still need something to join the two pieces of wood even when the joint is a perfect fit. And for this, the PVA glue is always the best choice for them because it absorbs into the wood and once it dries it is almost impossible to separate the two pieces without damaging them. This glue will hold better when you clamp the two pieces of wood as it continues to dry.
#3. Cement and Mortar
It is common to add the PVA glue to cement and mortar mix. One of the main reasons for this is that the glue resists moisture and mildew and so adding it to the mix helps to improve its waterproof properties. Also, it enhances the adhesion of a surface, and so it is also common to paint a coat of PVA on a surface before applying the cement mortar.
#4. Coating Absorbent Surfaces
PVA glue comes in handy when dealing with surfaces that are extremely absorbent. Before applying the finish, PVA is applied to the permeable surface to ensure that the finish does not dry out quickly as it would without it.
A good example is when plastering over an Artex ceiling, without applying a coat of PVA the plaster would dry out very fast and make it almost impossible to achieve a smooth finish. PVA will slow down the absorption of moisture and give you more time to work on the plaster.
How to Use PVA to Glue Wood
PVA is a low cost and very useful adhesive to have at home. However, it is important to know how to use it to ensure that you get maximum benefits from it. Although the method of use will depend on the application, here are some simple steps that you should follow when using it on wood.
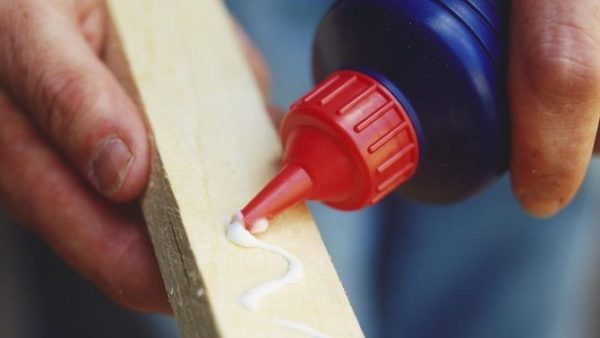
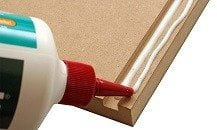
Step 1: Squeeze it Onto the Wood
The first step when using PVA glue with wood and also most other materials is to press it onto the surface. You should squeeze the glue onto the two pieces of woods at the point that you want to join them and then rub off any excess or spills with a damp cloth immediately.
Step 2: Spread the Glue
After squeezing and removing any spills from the surface of your two pieces of woods the next step is to spread out the glue. You can use a woodworker’s glue spreader or a brush but make sure that you spread a thin coat through the surfaces that you want to join.
Step 3: Push Pieces Together
Once you are content that you have a thin and uniform layer of adhesive on the two surfaces, the next step is to push them together. When doing this, you should rub them from one side to the other to ensure even distribution of the adhesive and to remove any trapped air.
Step 4: Clamp Them Securely
Clamping is an important step when using PVA on wood, and you should not skip as it improves the connection. And so, after pushing the two pieces together, you should use a G-clamp or a few of them (according to the size of your pieces) to clamp the wood. You should then leave the clamped pieces of wood for about 24 hours before you take off the clamps.
Read More: 8 Popular Types of Clamps for Woodworking
Step 5: Sand off the Excess
The last step is sanding off any excess glue that might dry out on the surface of the wood. No matter how keen you are with the quantity of PVA and how you apply it, the likelihood is that you will still have some excess when you clamp them, but this should not be an issue because sanding will help to maintain the aesthetics.
Types of Wood Glue [ Infographic ]
As we have seen, there is a multitude of wood glue that is suitable for various applications. From precision work to brute bonding strength, there is a glue available. Here is a more detailed rundown of the most popular type of wood glues reviewed so far.
#1. PVA Glue
PVA based wood glue is perhaps the most commercially available and best woodworking glue for carpenters. It has a distinct “yellowish” tint, but can also be found under different darker tones like dark brown. PVA glue is a family friendly glue, which means that it is non-toxic and can easily be cleaned with cold water (when glue is not set). It is semi-viscous and can easily fill-in crevasses in wood material.
Once set, PVA glue becomes waterproof and has a relatively strong hold. It is certainly not the strongest, but it is adequate for almost any type of wood gluing, either for personal or commercial use. There are different types of PVA glue available, at the prerogative of glue manufacturers. Some glue has a strong initial hold and sets quickly, while others can take hours to dry. Tite-bond and Elmer’s Carpenter’s Glue are two of the most popular ones. Of course, there are many others.
One thing to be wary of when using a PVA wood glue is that it does not absorb stain. This means that everywhere you applied PVA glue, it will become conspicuous once it sets. You will need to sand the glue then apply a layer of paint on the glue. Sadly, varnish does not fare well with PVA glue.
Another caveat is that PVA wood glue is permanent and cannot be removed for repairs. PVA glue also generally sets harder than wood so you will have to literally saw trough a glued surface. The main advantage of this glue is that it can easily be cleaned with cold water before it sets. But once it does, it becomes almost weather-proof. PVA glue is usually one of the best glue for wood because of its versatility.
#2. Cyanoacrylate Glue
Cyanoacrylate glue is a popular type of glue that is known to glue any type of surface, not necessarily wood. It is commonly known as super glue, crazy glue, and its other variants. Cyanoacrylate glue is not usually available commercially in big bottles or gallons, but is rather sold in small one part tubes ranging from 0.78 oz to 10 oz. The reason being Cyanoacrylate glue is quite expensive and a gallon worth will cost many hundreds of dollars, far too expensive for any practical use or price justification.
Cyanoacrylate glue dries up pretty quickly, usually within minutes and fully sets in 24 hours. It dries with a distinctive white haze and not the perfect glue for surfaces that cannot be treated cosmetically. Cyanoacrylate glue is mostly available in liquid form, but there are variants that are sold as a gel. This glue is one of the strongest wood glue available and regarded by many as one of the strongest glue in the world for general purpose gluing.
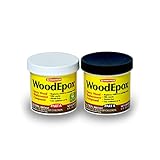
#3. Epoxy Glue
Originally available for industrial purposes only, epoxy glue is becoming quite popular as a general purpose commercial glue. Epoxy glue is sold as a two-part glue, one containing the resin and the other a hardener. When it mixes and sets, it becomes an extremely hard transparent material (epoxy) that has a very strong bonding strength.
When gluing wood, Epoxy glue is sometimes used as a rotted or missing material glue. When it dries, it replaces the missing wood surface and becomes a solid uniform surface. This glue most of the time requires painting as it is not the most aesthetically pleasing finish. It sets very hard though and is impervious to water and other elements, making it excellent for both interior as well as exterior use.
#4. Polyurethane Glue
Polyurethane Glue is commonly known as Gorilla Glue. Regarded as the strongest glue in the world, Gorilla Glue can bond anything solidly with a record cure time of minutes. It is recommended to wet the surface to be glued first as this glue cures with water (moisture). One distinct characteristic of Polyurethane Glue is that it expands while it sets. This means that precision work is usually out of the door with this glue. It is mostly about strength.
#5. Hot Melt Glue
Not the strongest of glue, hot meal glue or more commonly known as hot glue is mostly for temporary fixes. It has one of the weakest bonding strength and is usually applied with the help of a glue gun. The material used for this glue is resin, but unlike epoxy glue that equally uses resin (along with a hardener), resin by itself is pretty weak. The main use of hot glue in woodworking is simply to hold wood material together temporarily while a stronger glue is applied.
#6. Hide Glue
Hide glue is the oldest glue known to man. It is made from animal collagen and has a relatively strong bonding strength that is pretty much on par with many modern glues like PVA glue. One of the major advantage of hide glue is that it is non-toxic, can easily be stained and available in a wide array of colors.
The other is that collagen glue (hide glue) can be re-used if heated. It will melt and solidify again. It is a perfect glue for introducing children or beginners to wood glue. It does not fare well to the elements and is, therefore, ideal for interior purposes only.

Source: Fix.com Blog
Tips on Using Wood Glue
Applying wood glue is not as self-evident as one would think. There are some preliminary steps and tips that need to be taken into account to get good results. Here are a few noteworthy ones:
#1. Clean Surface
Before applying the first drop of wood glue, make sure that the bond surface is clean and free of any past glue residue. Fresh wood glue does not stick well on untreated surfaces. You can gently sand the surface with a medium grit sandpaper then clean the surface with a wet cloth.
#2. Know your Glue
It is important to know the glue type you are using. Some glue like hide glue or Polyurethane requires a moist surface to cure. Others like Cyanoacrylate or epoxy requires a totally dry surface. You can check the user’s manual or instructions for the proper use of the glue.
#3. Use Wax Paper
When using clamps to apply glue, use wax paper to protect the metal clamp from the glue. Not only does wood glue damages metal, the moisture in the glue will cause the clamp to leave an undesired dark skid on the material.
#4. Use a Notched Trowel
When applying glue, it is a good practice to use a notched trowel to do so. It will help spread the glue evenly and prevent bumps when it cures. It also helps the glue to dry uniformly and gain a little bit extra in bonding strength.
You do not necessarily have to buy a trowel. You can use a D.I.Y trowel or even a flat piece of wood to help spread the glue. Whatever you use, the point is to spread the glue evenly throughout.
#5. Remove with Water
The best wood glue is also one that is easily removed and corrected right after application. Fresh PVA glue is regarded as one of the best wood glue because it can easily be removed and mistakes corrected by simply wiping with a wet cloth.
#6. Chisel Off
About 30 minutes after gluing the wood, it is a good idea to chisel off the extra "squeeze-out" glue. Doing so when the glue is at the brink of hardening makes it easier to remove and correct any mistakes. It is not hard enough that it will damage the surface when removed and soft enough to be removed easily with little effort. Remember to use a sharp chisel as a jagged edge chisel might damage the wood.
You will need to decide on the best time to chisel off because not all glue dries up at the same time.
#7. Secure the Wood
Wood glue is very slippery, especially when used generously. Furthermore, it may take up to 3 hours for some glue to dry. Meanwhile, the glued surface may slip and ruin your project. A good way to prevent this situation, even when clamping is done, is to temporarily nail the surfaces together. A brad nailer is perfect for this situation. It offers good holding force and can easily be removed without damaging the material.
#8. Be Safe
It is important to observe security measures when working with wood glue. Some Polyurethane, Cyanoacrylate, and Epoxy glue are the strongest glue for wood but may require surgical intervention if they dry on your skin. Wash your hands thoroughly with water after every use and avoid any contact with your eyes.
Reference:
Last Updated on August 14, 2020 by Tom Bradly