Chip Carving: Ultimate Guides for Beginners – Tools, Tips, Resources & More
Chip Carving is a fascinating and rewarding way to manipulate wood. All you need are simple woodworking tools, patience, and a little bit of time on your hand. If you are interested in chip carving, then welcome! Here you will learn everything about this hobby to get you started the right way.
What is Chip Carving?

Chip carving is a relatively old decorative hobby. Some experts even claim that chip carving has been around even since the early men started making decorative artwork. This is mostly attributed to the fact that all that is required to chip carve is straightforward tools and a piece of wood. Basically, chip carving is a 2-stage process. It is simply removing the crust of material “chip” with a chisel and mallet to reveal the inner layer. This bevel difference between the material chipped away in contrast to the remaining surface creates a chip carve pattern.
Types of Chip Carving
Fine Triangle Chip Carving: The first one is patterns created from triangular shapes. This is called fine triangle chip carving. The main advantage of this type of chip carving is that it is in itself a guideline and allows you to reproduce the same pattern over and over again.
Free-form Chip Carving: The second form of chip carving is free-form chip carving where you make fine cutlines of different shapes and from different directions. This produces a random pattern and allows you to use your imagination to create any type of artwork.
The combination of those two allows you to make versatile and varied artwork from softwood.
Tools for Chip Carving
Of course, when chip carving you will need a few specialized tools. Nothing much, and they also do not cost a lot of money. In fact, this is one of the main advantages of chip carving. Without further ado, here are some useful information about chip carving along with the tools you will need.
Wood Types for Chip Carving
The softer the wood, the better the chip carving result. Wood like butternut is ideal because they can easily be cut without much effort. Mahogany is the last type of wood that is recommended for chip carving. Past that, you will usually get high-density wood like white oak which is tough to work with. With harder wood, you will need a chisel and mallet to chip carve and cannot use a simple stab knife or pocket knife to do so.
Knife Types for Chip Carving
There are 3 types of knives you can use for chip carving.
Chip Carving Knives
This is the primary tool you use when chip carving. The blade of this type of knife is usually shorter compared to other types with a large resin handle. This allows you to grip the knife comfortably. With a shorter blade, your hand is closer to the material which helps you deliver a more accurate cut. The blade of the chip carving knife is also curved to an angle with a sharp and pointy nose which digs deep in material.
There are several sizes available for chip carving knives, ranging from small to large depending on the work you have at hand. Our personal favorite chip carving knife is the Flexcut Chip Carving Set.
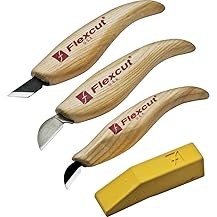
The Flexcut Chip Carving Set has a very tough high carbon steel blade that removes chips quickly and easily. It also comes with a stab chip carving knife. Additionally, the resin handles have an ergonomic form factor making them very comfortable to hold for long hours without hand fatigue. This set is delivered as a kit, so you also get a Flexcut sharpening stone with gold polishing compound for sharpening your chip carving knives. It is also a reasonably affordable solution that will not break the bank. If this is your first chip carving knife, go with the Flexcut set as it is an all inclusive kit that will help you get started with chip carving right away.
Check Price & Reviews on Amazon.com
Stab Knives
The stab knife is a straight-edge blade knife to make straight line accents in your chip pattern. The blade of the stab knife can easily be sharpened for very precise cuts. Basically, you simply push in the material in a perpendicular fashion with the stab knife to remove material. Since this requires a larger surface area, it also means that the stab knife blade needs to be sharp at all times.
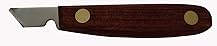
Our favorite stab knife is the “My Chip Carving Platinum Edition” with AEB-L stainless steel blade. This particular model has a rosewood handle that is very comfortable to hold and thumb notches to register your grip when chip carving.
Check Price & Reviews on Amazon.com
Detail Knives
As their name suggests, detailed knives are mostly used for detailed work. They have a very pointy nose that penetrate deep in the slope floor of your chip and allow you to make very accurate cuts on a very small amount of material. When choosing a detailed knife, it is important to go with a model that has a short blade so that your hands can be closer to the chip. This will allow you to make much more accurate cuts.
Pocket Knives
Also called a utility knife, you can use a regular pocket knife for chip carving. Although, this is not usually recommended as they cannot deliver accurate results as specialized chip carving tools. However, they are usually inexpensive, and in the hand of an expert, a pocket knife can still get the job done and produce a timeless work of art.
Read More: 10 Best Whittling Knives For Beginners
Should You Choose a Pocket Knife for Chip Carving?
We often see many people selecting a pocket knife over a specialized chip carving knife. While we understand that pocket knives can be much cheaper and more readily available, we do not recommend people to use pocket knives when chip carving. The blades are usually not as strong as a true carving knife and may snap at any time. Additionally, the blades are also a little too fat to deliver an accurate result. At least, most beginners will have a lot of difficulty working with a pocketknife when chip carving.
Sharpening Stones
You also need softening stones when working with those tools. You do not want a dull blade. When chip carving, the sharpening stone grit is very important. A 1000 grit sharpening stone is used to create angles in the blade. A 1000 grit stone is used mainly when a chisel and mallet is used for chip carving. This will allow you to sharpen a wide bevel of up to 25 degrees. With other chip carving tasks like relief carving, it is generally recommended to use a bevel angle of no more than 20 degrees and a finer grip stone.

For cutting tasks, you want to go with a very high grit sanding stone in the range of 6000 - 8000 grit size. This will sharpen the cutting edge of the blade and create an invisible and super-sharp strip of steel at the edge. Since it is so sharp, it can chip material very easily and does not require a lot of hand force.
If you do not currently own a sharpening stone, the King Two Sided Sharpening Stone is an excellent choice. It is delivered in both 1000 grit for angle sharpening and 6000 grit for blade tip sharpening. It is also quite affordable.
Emery Cloth Sandpaper

Emery cloth sandpaper is another easy to use sharpening tool, especially when performing relief carving. The most popular grits used are 500, 1000, 1,500, and 2,000 - but there are finer and coarser grits available on the market. We recommend 3M 32044 Imperial Wetordry Emery cloth with a grit size of 2000 as a cheaper solution to sharpening your knives.
Measuring Tool

You can easily draw patterns using a T-Square and #2 size pencil directly on wood before carving. For this, you will need measuring tools like the Acme C8735532 Junior T-Square. It is transparent and allows you to view your drawing patterns under the instrument at all times.
Check Price & Reviews on Amazon.com
Hand Positions for Chip Carving
One of the most important factors when chip carving is your hand positions. It finally dictates the result and the quality of your work. There are several positions you can adopt when chip carving. Here are a few of the most common ones:
Basic Position: In this position, the top size of the knife handle fits in the bend of your index finger while the whole handle lays in your clutched hand. You apply a gentle force and carve through material by pivoting on the handle alone.
Three and Four Sided: The three and four side is similar to the basic position except that the knife is held 45 degrees and pushed into one triangle leg at a time and cuts towards the center.
Straight-wall: In this position, you push deep into 2-sides of your triangles at an angle of 85 - 90 degrees.
Sloped Floor to Straight-wall: In this position, you need to cut low on the material, at almost a horizontal position. It is exactly like peeling the chip instead of digging deep. It is better suited to use a detail knife for this position mostly because of the low-profile blade and sharp nose.
Curved-edge: Curves are one of the most common patterns you will have to face when chip carving. You cut curves by varying your hand angle. To start carving a curve, you position your hand at a 45-degree angle and then as you approach the center of the cut, gradually drop to a 30-degree angle. This hand position is similar to a “scooping” effect. You drop to a 30-degree angle every time you reach the center. The best tool for this position is the chip carving knife and always use the tip of the knife to carve.
Free-Form: You use free-form style when carving 2-side patterns. The chip widens at the center point of the line and then gradually fades back to a fine point in a v-through line. You can use the same 45-degree to 30-degree hand position change as in the curved-edge to make a free form chip.
Chip Carving Patterns
There are several patterns that you can draw and chip. Here are a few examples that will get you started right away.
Plates: They are triangular patterns that morph into a circular shape. They are ideal when chip carving on round objects like bowls or plates. You can use any type of knife to perform a plate pattern, from chip carving knife to a stab knife.
Practice: As its name suggests, practice is a series of patterns that requires different hand positions as well as the use of different chip carving knives. It is an excellent pattern to practice on and gain some experience.
New Release: The new release is a popular pattern style that can be performed almost exclusively using a chip carving knife. Some people can even do it with a regular pocket knife. the positive and negative space of new release is not the best, but it is still a good and popular pattern.
Clocks: The clock is another excellent shape that is relatively easy to make.
Boxes: A popular pattern that will require almost all types of carving tool to perform.
Chip Carving Tips
To help you get the best out of your chip carving endeavors, here are some helpful and practical tips.
- When chip carving, keep your hand above the surface and only your thumb rested. Rotated your hand by using only your thumb as a pivot. This will provide better maneuverability and allow you to perform more accurate chip carving.
- Always make a curved cut with your elbow and not your wrist. Such that your wrist always points forward and you maneuver your knife with an elbow motion. You cut lines will be smoother.
- When you have to cut through a pattern, cut position one on all your triangles then return to cut position two, and so on so forth. This will guarantee a more professional finish with cuts of the same positive stops throughout.
- Place a cloth on your lap when chip carving. It will catch the chips flying all over the place and help you to clean up more easily afterward.
- Don’t clench on your knife handle too hard and take occasional breaks to alleviate your wrist. Additionally, it is recommended to use a chip carving knife with an ergonomic form factor to avoid hand fatigue.
- If you don’t feel confident with a particular cut, don’t do it. You can start with either the easiest carving first or last. Try to find a work style that personally suits you and your chip carving pace.
- Work on softwood rather than harder wood. Wood like butternut are very easy to work with and also pleasurable. Avoid material like white oak for chip carving as they are very difficult to work with.
- Sharpen both your blade angles and edges. With the blade angle, you can use a coarser grit sanding stone while with the edges, always go with a sanding grit of at least 1,500.
Chip Carving Books for Beginners
Here is some informative and ultra-affordable book to take reference from.
The Complete Guide to Chip Carving
Editor's Rating:  (4.6 / 5)

Written by Wayne Barton, The Complete Guide to Chip Carving is a beginner-friendly guide to chip carving. This 144 pages paperback book will guide you to choosing the best tool for the job and making complex chip carving patterns in material. It is beautifully illustrated with colored pictures as well as written in an easy step-by-step manner. If you have never chip carved before, this manual is a very good place to take reference from.
Check Price & Reviews on Amazon.com
Chip Carver's Workbook
Editor's Rating:  (4.7 / 5)
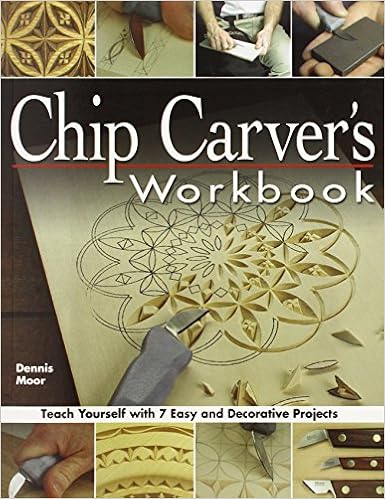
The Chip Carver's Workbook by Dennis Moor is a smaller 96 pages paperback book. However, it is jammed-packed with information that will help you up your game as quickly as possible. It is a very informative manual that starts by explaining about the history of chip carving and then gradually goes on to the more difficult tasks. It is very newbie-friendly with colored photographs to guide you along the way.
Check Price & Reviews on Amazon.com
Chip Carving Workshop: More Than 200 Ready-to-Use Designs
Editor's Rating:  (4.5 / 5)
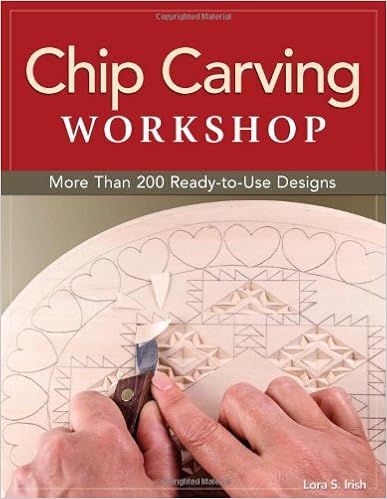
Last but not least, we have the Chip Carving Workshop by Lora Irish - a very well-known chip carver. She illustrates you the world of chip carving in very simple terms and newbies will have no problem following this guide, all the way to carving more complex patterns. This 144 pages paperback book has over 200 practice projects like making geometric shapes and free-form designs to can use to get better at chip carving.
Check Price & Reviews on Amazon.com
How to Transfer Patterns to Wood
There are several methods that you can use to transfer a design to wood for chip carving successfully. Everyone have their particular way, and probably with time, you might even develop a favorite method. However, some time-tested methods work every time. Here are a few of them.
Preparation: First and foremost, before applying a design pattern to your word it is important that you prepare your material. Use a light sanding paper with a grit of 320 or more to do so. The aim is to simply sand any rough surface and make it as smooth as possible before you begin chip carving.
Pattern Tracing
If you already have a pattern printed on paper, then it is easy to transfer it to your wood using graphite paper. Slide the tracing paper over the paper design and start tracing. Of course, when tracing you should use other tools like a. T-ruler, #2 pencil and even a compass to mark each and every line of the pattern.
Advantages: It is quick and easy to transfer any pattern onward using the pattern tracing method. Have you found a good design in a book? No problem with this method. Just place a tracing paper over it and start tracing.
Disadvantages: Since you are tracing by hand, it is not as accurate, and you can sometimes make mistakes. You will need to be very careful and attentive when using this method. Furthermore, it can become more difficult when using a complex design pattern. It is also somewhat time-consuming.
Glue Directly on Wood
Of course, the easiest way to transfer a pattern to wood is by gluing it directly on your material using a spray of wood glue. Be careful not to spray too much wood glue as it may later become a problem. A good way to remove the design from your wood when you are finished is to leave it in lukewarm water for a few minutes. This will unbind the wood glue making the pattern come off quickly.
Advantages: This method is by far the easiest. Simply glue your pattern directly in the wood and start chipping right away. You can chip very complex patterns using this method with a remarkable accuracy when using the right chip carving tool.
Disadvantages: Since you are gluing directly over the wood, you need to use a high-quality wood glue that can easily be removed later on. If else, it can spoil the result as it is not recommended to apply sending paper over chip carving. This might damage the chips, especially if you have complex and intricate chips.
Chip Carving Graph Paper
You can easily download chip grids online to use as tracing paper or a general guideline when chip carving. Those graph papers come in 1/4” and 1/3” grid patterns. You will need to draw your pattern on those chip carving graph paper before gluing it or tracing to your material. Many design patterns already come in graph paper size. They are more convenient to use, as long as you find a pattern that appeals to you. If not, you can always draw your own.
Pattern Simplifying
If you are having difficulty chip carving a particular pattern, then probably it is a little bit too complex. One way to get around this issue is to simplify the pattern. Try to remove unnecessary lines and mark the center point of every chip. Once you are done, go ahead and glue the pattern over your material again. It should be now easier to chip carve.
Cutting Rules for Chip Carving
To get the most out of chip carving, there are some important chip carving rules to follow. Here are the most important ones.
Applying a Pattern: We can understand that you want to go freestyle when chip carving. After all, this hobby greatly depends on imagination. However, without a pattern, it can quickly become difficult to get a consistent and professional result from chip carving. This is especially true if you are a newbie and lack the chip carving experience. Therefore, always glue a pattern over your material before chip carving. It will provide an easy to follow guideline and make chip carving much more fun.
Chip Angle: There is no specific way to chip carve. Even professionals do it in a way that is particular to them. However, it is always good to follow some good practices when chipping away. For one, your blade must be at a 45-degree angle when chip carving and drop to a 30-degree when reaching the centre point. It is pretty much like a scooping effect. This guarantees that you get a consistent and professional result. Of course, the more skilled you get the less you have to worry about the chip angle. However, bear in mind that the chip angle is of particular importance when using the chip carving knife and less with a stab knife.
Choosing a Knife: Your chip carving knife needs to have a razor-sharp edge to deliver a smooth cut. Without a smooth edge, you will get ragged edges on your chip that will force you to do multiple passes - significantly diminishing the quality of the chip.
Additionally, do not cut too deep in your chip and the maximum should be around 1/8” deep. If your chip is too large, remove it in multiple stages rather than one pass. A chip carving knife is your best friend when digging in large chips.
Finish: When doing the finish, try to avoid glossy paint or glossy veneer as they make the result look plasticky and cheap. A Matt finish is always the best with chip carving. Also, remember to remove any trace of design pattern you may have glued on your material.
Common Mistakes on Chip Carving
To help you get better at chip carving, some common mistakes to avoid.
1. Sometimes when chip carving, you encounter the problem of ragged walls. This is most of the time due to your chip carving knives not being sharpened enough. As a good practice, it is important to sharpen your knives before and after every use. It will keep them in good condition and ready for action at any time.
Read More: 7 Best Pocket Knife Sharpeners
Additionally, ragged walls can be caused when used on hardwood or wood that is difficult to chip. This can be a recurring problem with would like mahogany when used with a hand tooled instead of a chisel and mallet. If you want to provide ragged walls altogether, then use a lower density would like butternut or brass wood.
2. When chipping a material, ensure that the center of your chip is a clear point with sharp outer lines. This is called a positive space and all your positive spaces need to be of the same dimension for an ecstatically pleasing finish.
3. Do not use multiple strokes to chip. One swift movement will produce the best result. Your chip wall will be cleaner and more consistent throughout.
4. Do not reach too deeply into the chip as it may break the point. Feel free to use different chip carving tools instead of using only one tool over and over again. Remember that there are three chip carving tools and each has their own particular use.
5. If you face a chip out problem, you can quickly and easily repair it with wood glue and a toothpick. You will need to do it as quickly as possible so as not to lose focus. Do not wait and do it later with a chip out.
Chip Carving Resources on the Internet
To improve your chip carving skills, it is important to learn from the best. As a matter of fact, here are some of the best chip carving resources you can find online. Best, all of them offer free information.
lsirish.com: This site is a treasure-trove when it comes to chip carving. They have very detailed information on anything related to carving, including whittling. They write in plain language and for beginners.
Fundamentalofwoodworking.com: This website is not restricted to chip carving. It contains a lot of free information on anything related to woodworking in general. If you want to learn about the best woodworking tools to have in your workshop or learn how to wood turn using a wood lathe - they have it!
LeeValley.com: This site is a mail order commerce site where you can buy your power tools, including chip carving knives. They also have a very informative monthly woodworking newsletter.
MyChipCarving.com: This site is exclusively made for chip carving. Additionally, you can get many free chip carving patterns to kickstart your imagination on mychipcarving.com
Conclusion
As we have seen, chip carving is not as easy as it seems. However, it is not too difficult either. We hope that our ultimate guide to chip carving has helped you up your game. At the end of the day, all that is required is practice. The more you chip carve, the better you get at it and the more complex patterns you will be able to make. Once you have gained the necessary skill set to chip carve, the sky is the limit. You will be able to make timeless works of art using inexpensive and basic tools quickly and easily.
Read More: Ultimate Wood Carving Guides For Beginners
Resources: